Login by Metamask - Rest Backend in Fastify (Node, Typescript, Prisma) Part 1/2
We building from scratch rest api in fastify using mongodb connected by prisma as database, jest as test framework and etherjs to verify signatures signed by metamask.


Metamask is a crypto wallet & gateway to blockchain apps. It can be installed as mobile app or browser extension. Maetmask can be used to build costless, cryptograficly secure authorization flow without processing personal data.
In this blog I will show you how to prepare rest api in fastify. To test we will use jest. As db we select mongodb connected by prisma. First part describes setup version endpoint and configuration of environement. Then we will show diagram of auth flow, connect database and implement all endpoints.
Setup Node Project with Typescript
Firsts commands in new nodejs project with typescript are always initialization of package.json
npm init -yand tsconfig.json
tsc --initNow we have to decide, how to run our project. Ancient methods like ts-node with nodemon was abandoned by me when I meet ts-node-dev. It restarts target node process when any of required files changes (as standard node-dev) but shares Typescript compilation process between restarts. This significantly increases speed of restarting comparing to mentioned solutions. In package.json scripts we can add line:
"dev": "ts-node-dev --no-notify --respawn --transpile-only src/index.ts",
lets install ts-node-dev
npm i -D ts-node-devin src/index.ts we can add content
async function main() {
    console.log("ok");
}

main().catch(console.error)
and run it by
npm run devIt will show "ok" and will wait for changes to react on them in real time.

Add Fastify with first endpoint
Fastify is framework similar to express but with two advantages
- it is about 20% faster in requests processing
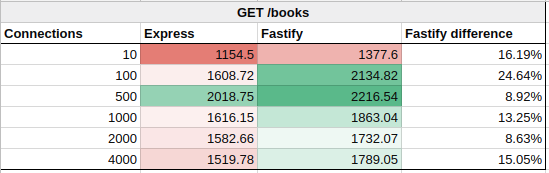
- it is faster in developemnt thanks to useful simplifications in his API
One disadvantage of fastify is smaller comunity (32 times smaller now).
To install fastify type:
npm i fastifyNow we can create src/fastify.ts with content:
import fastify, {FastifyInstance} from "fastify";

export function getFastifyServer(): FastifyInstance {
    const app = fastify({})

    // there add
    // - endpoints
    // - hooks
    // - middlewares

    return app
}
and in src/index.ts import it and use to run server on selected port
import { getFastifyServer } from './fastify'

async function main() {
    const app = await getFastifyServer()
    await app.listen({ port: 4200, host: '0.0.0.0' })
    console.log(`Fastify listen on http://localhost:4200/`)
}

main().catch(console.error)
Now it is not very useful, because we did not defined any route, middleware or hook to process requests. Lets do it and define / endpoint.
First endpoint in Fastify - project version
This will be public route but to no litter fastify.ts file we will create next one src/routes/version.ts with content
import pJson from '../../package.json'

export class Version {
    static async root() {
        return {
            name: pJson.name,
            version: pJson.version,
        }
    }
}
It is simple class with static method that returns object. Fastify will convert it to response with content type application/json for us, but we have to enable resolveJsonModule option in tsconfig.json
"resolveJsonModule": true, /* Enable importing .json files. */
now in center of fastify.ts file we can add
app.get('/', Version.root)and request to main route of our server
http -b localhost:4200starts return response
{
    "name": "metamask-fastify-rest-api",
    "version": "1.0.0"
}

Tests in Jest with esbuild
If you are programmer more time, than one day you are aware how easy is break up your working program changing something in source code in random places. Fortunately we can write test that prove that code is working as we expecting.

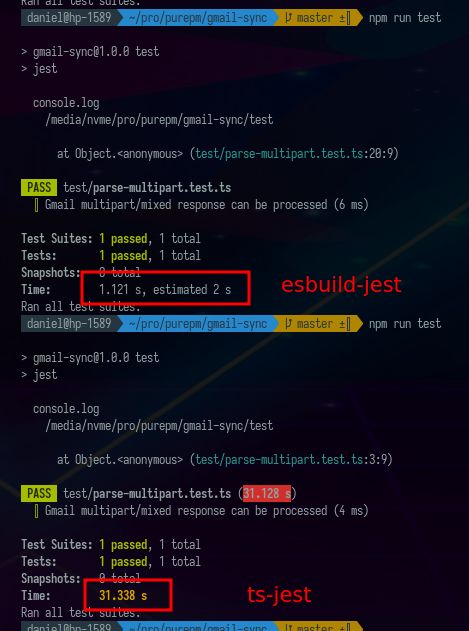
In node js word one of best testing frameworks is jest. But to connect it with typescript we need plugin that will transform ts files. It is terrible that most popular ts-jest is 2000 times more frequently used that about 26 times faster jest-ebuild. But lets use technology from the future - esbuild.
Our jest.config.ts will contain
module.exports = {
  roots: ['<rootDir>'],
  testMatch: ['**/__tests__/**/*.+(ts|tsx)', '**/?(*.)+(spec|test).+(ts|tsx)'],
  transform: {
    '^.+\\.(ts|tsx)$': 'jest-esbuild',
  },
  setupFilesAfterEnv: [],
  testEnvironment: 'node',
}
Lets install packages
npm i -D jest @types/jest jest-esbuildand add test script in package.json
our first test file test/version.test.ts can look as follow:
import pJson from '../package.json'
import { getFastifyServer } from '../src/fastify'

const correctVersion = { name: pJson.name, version: pJson.version }

describe('i can read version', () => {
  it('from rest api', async () => {
    const server = await getFastifyServer()
    const result = await server.inject({
      method: 'GET',
      path: '/',
    })

    expect(result.body).toEqual(JSON.stringify(correctVersion))
    expect(result.statusCode).toEqual(200)
    expect(result.headers['content-type']).toContain('application/json')
  })
})
Now when you type
npm testyou should see
 PASS  test/version.test.ts
  i can read version
    ✓ from rest api (14 ms)

Test Suites: 1 passed, 1 total
Tests:       1 passed, 1 total
Snapshots:   0 total
Time:        0.222 s, estimated 1 s
Ran all test suites.
We have configured fastify server with live reload development environment and super fast tests configured in jest. We created first endpoint that returns name and version of server on root endpoint. It is time to describe auth flow and implement required routes.
Auth flow diagram
Generally idea is the following. User has private key connected with his wallet address. We can save this address to database as his unique id and generate nonce for him. Nonce is simple random phrase generated to check if user can correctly sing it using his own address. If nonce will leak, it is nothing scarry, because nobody will be able to sign it with correct address is he does not possess private key. Below we presenting diagram:

So we need users collection only with address and nonce and 4 endpoints
- to get nonce for given address
- to register new address and assign him nonce
- to login using address, nonce and signature
- to get my account details using JWT token
DB model with prisma
Prisma is greate pice of software that helps to use database in reliable way thanks to great types and interfaces allowing to staticly validate all places in code when we using database.
To install prisma we will need two libraries
npm i prisma @prisma/clientNow typing:
npx prisma initwe can generate initial setup.
There was created .env with DATABASE_URL and prisma/schema.prisma, that by default use postgresql. We need mongo so lets modify file with schema
generator client {
  provider = "prisma-client-js"
}

datasource db {
  provider = "mongodb"
  url      = env("DATABASE_URL")
}

model users {
  id      String @id @default(auto()) @map("_id") @db.ObjectId
  address String @unique
  nonce   String
}
and in .env we can select address to our mongo database
DATABASE_URL=mongodb://localhost:27017/web3_bdl
Mongo in Replica Set Mode
It is important, that prisma now using mongo in replica mode.

to configure it you will need add lines
replication:
  replSetName: rs0
to your mongodb config /etc/mongod.conf. This path depent from your OS.
In mongo cli you should execute
rs.initiate()to setup replica set and
rs.status()to check it. You will have to restart your mongo service to read changes from config.
Generation typescript from prisma
If you have correctly configured mongo and created user models, run
npx prisma generatethis command will generate typescript to help with autocompletion and static validation your further code.
Single prisma client for all application
It is rather good practice to configure db access point in single place and import it from this file than use library. In our case it will be file src/storage/prisma.ts. In this file we will modify DATABASE_URL adding _test at the end in test environment. Thanks to this modification we can do not care about distinct set of env for test and can avoid overriding our local data during tests written in jest.
import {PrismaClient} from "@prisma/client";

function dbUrl() {
    const url = process.env.DATABASE_URL;

    if(!url) throw new Error(`No db url`);

    if(process.env.NODE_ENV === 'test') {
        if(url.includes('?')) {
            throw new Error('test url not implemented for this db')
        }
        return url + '_test'
    } else {
        return url;
    }
}

const prisma = new PrismaClient({
    datasources: {
        db: {
            url: dbUrl()
        }
    }
})

export {
    prisma,
    PrismaClient
}
Now we can import prisma from this place and get access to proper database in dependence from NODE_ENV.

Passing env to process
Not there is last challenge connected with databae - passing db address to program in secure way. We can do it by dotenv library but I prefer Makefile as access point ot application because it is more universal way and can be applied with python, go, ruby and other languages in the same way. This is my Makefile
include .env
export

node_modules: package.json
	npm i

up: node_modules
	npm run dev
so from now, instead of writing
npm run devyou can write
make upof course it is only solution in development mode. In production it is better pass environment variables using docker or similar solution.
Checking if user with address exists
First step in our diagram was checking is user with given address exists and get his nonce. If address no exists we want to return Not Found answer. We can use helper to create notFound answer using @fastify/sensible. Lets install it:
npm i @fastify/sensiblenow we can import it in src/fastify.ts
import fastifySensible from '@fastify/sensible'
and register in body of getFastifyServer function
app.register(fastifySensible)
To add endpoint finding users by address add here also line
app.get('/users/:address/nonce', User.getNonce)
We will need to import user from routes so in src/routes/user.ts lets create class User with static method getNonce like before we done with version.
import {FastifyRequest} from "fastify";
import {prisma} from "../storage/prisma";

export class User {
    static async getNonce(req: FastifyRequest<{ Params: { address: string } }>, res: FastifyReply) {
        const address = req.params.address;

        const user = await prisma.users.findUnique({
            where: {
                address
            }
        })

        if (!user) return res.notFound()

        return {
            nonce: user.nonce
        }
    }
}
Now we can test it manually
http -b localhost:4200/users/123/nonce
{
    "error": "Not Found",
    "message": "Not Found",
    "statusCode": 404
}
but it is better to write tests in jest. Before writing tests we will prepare src/storage/seed.ts file with function seed to clear our database.
import {prisma} from "./prisma";

export async function seed() {
    await prisma.users.deleteMany();
}
Now in test/address.test.ts we can write tests to check if this endpoint is working.
import { getFastifyServer } from '../src/fastify'
import {seed} from "../src/storage/seed";
import {prisma} from "../src/storage/prisma";

describe('searching user by address', () => {
  it('address not found', async () => {
    await seed();

    const server = await getFastifyServer()
    const result = await server.inject({
      method: 'GET',
      path: '/users/abc/nonce',
    })


    expect(result.statusCode).toEqual(404);
    expect(result.body).toEqual(JSON.stringify({
      statusCode: 404,
      error: "Not Found",
      message: "Not Found"
    }))
  })

  it('address found and nonce is correct', async () => {
    await prisma.users.upsert({
      where: {
        address: "abc"
      },
      create: {
        address: "abc",
        nonce: "secret"
      },
      update: {
        nonce: "secret"
      }
    })

    const server = await getFastifyServer()
    const result = await server.inject({
      method: 'GET',
      path: '/users/abc/nonce',
    })

    expect(result.statusCode).toEqual(200);
    expect(result.body).toEqual(JSON.stringify({
      nonce: 'secret'
    }))

  })
})
Here we covered all possible scenarios.

Register user using wallet address
Now user can check if his address is registered. Of course if he will see our app first time, he will not be registered, so he will get 404 and will try to register his address. Lets implement registration.
Nonce have to be random string. To generate it we will use uid package.
npm i uidIn src/routes/user.ts we adding new static method do User class
    static async register(req: FastifyRequest<{
        Body: {
            address: string
        }
    }>, res: FastifyReply) {
        const found = await prisma.users.findUnique({
            where: {
                address: req.body.address
            }
        })

        if (found) return res.code(200).send({
            nonce: found.nonce
        });

        const nonce = uid(20);
        await prisma.users.create({
            data: {
                address: req.body.address,
                nonce,
            }
        })

        return res.code(201).send({
            nonce
        });
    }
Logic here is super simple. We are seraching for user. If exists response code is 200. If no, then user is created and response code is 201. In any case we want to return user nonce.
In src/fastify.ts we adding line that will register this handler
app.post('/register', User.register)
We can cover it by test similarly like before
import { getFastifyServer } from '../src/fastify'
import {seed} from "../src/storage/seed";
import {Response } from "light-my-request";

describe('user can register account', () => {
  it('first and second registration', async () => {
    await seed();

    async function registerUser(address: string): Promise<Response> {
      return server.inject({
        method: 'POST',
        path: '/register',
        payload: {
          'address': address
        }
      })
    }

    const server = await getFastifyServer()
    const result1 =await registerUser("abc")

    expect(result1.statusCode).toEqual(201);
    expect(result1.headers['content-type']).toContain("application/json");

    const result2 =await registerUser("abc")

    expect(result2.statusCode).toEqual(200);
    expect(result2.body).toEqual(result1.body);
  })
})

Login user by signed message
Now we have to implement verification of signature created by metamask. We can do it using function verifyMessage delivered by library etherjs.
Verification of signature with etherjs
npm i ethersin new file src/auth/getUser.ts we can create some auxiliary functions.
import {utils} from "ethers";
import { users} from "@prisma/client";

export function getAddress(nonce: string, signature: string): string {
    return utils.verifyMessage(nonce, signature).toLowerCase()
}

export function verifyUser(user: Pick<users, 'nonce' | 'address'>, signature: string): boolean {
    try {
        return getAddress(user.nonce, signature) === user.address;
    } catch {
        return false;
    }
}
first one give us address used to sign message. Second check if this address is the same like possessed by our user. In test/auth.test.ts we can check if it works.
import {verifyUser, getAddress} from "../src/auth/getUser";

const address = '0xa68701d9b3eb52f0a7248e7b57d484411a60b045';
const nonce = '14b2a79636d81fbb10f9';
const signature = '0x5d8f425c91437148b65f47e9444d91e868d3566d868649fec58c76010c8f01992edd2db3284088d5f5048fc3bc9eff307e0cd1b8b1a2e6c96a2784eb5fd5358d1b';


describe('i can authenticate signature', () => {
    it('auth', () => {
        expect(getAddress(nonce, signature)).toEqual(address)
        expect(verifyUser({nonce, address}, signature)).toBeTruthy();
    })
});
values in test address, nonce and signature are prepared in browser.
Signing nonce in browser using metamask
If do you metamask you can get signature address typing in browser console:
ethereum.enable()and then
ethereum.selectedAddressIf you want to sign nonce lets create helper in browser console:
function utf8ToHex(str) {
  return Array.from(str).map(c =>
      c.charCodeAt(0) < 128 ? c.charCodeAt(0).toString(16) :
          encodeURIComponent(c).replace(/\%/g, '').toLowerCase()
  ).join('');
}
then define nonce
nonce = 'abc'and finally
await ethereum.request({
    method: "personal_sign",
    params: [utf8ToHex(nonce), ethereum.selectedAddress],
  })
Generation JWT token with user's data
Our next challenge is sending jwt token. To create it lets install two libraries
npm i jsonwebtoken dayjs
npm i --save-dev @types/jsonwebtoken
In src/auth/getUser.ts we can define next helper to create tokens
import dayjs from "dayjs";
import jwt from 'jsonwebtoken'

const jwtKey = process.env.JWT_SECRET_KEY ?? 'test';
const issuer = 'I <3 web3'; // name of organization


export function tokenizeUser(user: Pick<users, 'address'>): string {
    return jwt.sign({
        sub: user.address,
        iss: issuer,
        exp: dayjs().add(1, 'month').unix()
    }, jwtKey)
}
These tokens will have 1 month lifetime and will contain user address and info about organization. In .env we have to add line with our jwt secret key.
JWT_SECRET_KEY=123Login endpoint in REST api
Now we are ready to add login function to src/routes/user.ts
import {tokenizeUser, verifyUser} from "../auth/getUser";

// ...

    static async login(req: FastifyRequest<{
        Body: { address: string, sig: string, nonce: string }
    }>, res: FastifyReply) {
        const {address, sig, nonce} = req.body

        if (!address || !sig || !nonce) return res.expectationFailed('invalid body');

        const verified = verifyUser({address, nonce}, sig);
        if (!verified) return res.unauthorized();


        return {
            token: tokenizeUser({address})
        }
    }
in src/fastify.ts we need register /login route
app.post('/login', User.login)
Now we can add next test in test/auth.test.ts
import {getFastifyServer} from "../src/fastify";
import {seed} from "../src/storage/seed";
import {prisma} from "../src/storage/prisma";
import {Response} from "light-my-request";


    it('and see his token', async () => {
        await seed();
        await prisma.users.create({
            data: {
                address,
                nonce
            },
        })

        async function login(signature: string): Promise<Response> {
            return server.inject({
                method: 'POST',
                path: '/login',
                payload: {
                    address,
                    sig: signature,
                    nonce
                }
            })
        }

        const server = await getFastifyServer()
        const result1 = await login("abc")

        expect(result1.statusCode).toEqual(401);
        expect(result1.body).toEqual(JSON.stringify({
            statusCode: 401, error: "Unauthorized", message: "Unauthorized"
        }));

        const result2 = await login(signature)

        expect(result2.statusCode).toEqual(200);
        expect(result2.body).toEqual(JSON.stringify({
            token: tokenizeUser({address})
        }));
    })
Getting user data from JWT token
Finally we are ready to implement /me route, but It will be differ than any previous. It will not be public route. We are going to create middleware to guard this route. In this middleware we will recognize user and append them to request object living during this request processing.
First lacking element is function getUser. Lets define it in src/auth/getUser.ts file
interface JwtPayloadCustomer {
    iss: string
    iat: number
    exp: number
    sub: string
}

function getExpDate(jwtPayload: { exp: number }): Date {
    return dayjs.unix(jwtPayload.exp).toDate()
}

export function getUser(token?: string): JWTUser | null {
    if (!token) {
        return null
    } else {
        token = token.replace(/^Bearer\s+/, '')

        const jwtPayload = jwt.verify(token, jwtKey) as unknown as JwtPayloadCustomer

        const sub = jwtPayload.sub

        return {
            address: sub,
            token_expiring_at: getExpDate(jwtPayload),
        }
    }
}
returned interface JWTUser can be defined in src/interfaces/context.ts as
import { PrismaClient } from '../storage/prisma'

export interface JWTUser {
  address: string
  token_expiring_at: Date
}
Second lacking element is extension of FastifyRequest allowing to save user among request properties. In src/fastify.ts we can declare fastify module extending FastifyRequest.
declare module 'fastify' {
    interface FastifyRequest {
        user: JWTUser | null
    }
}
Now we can define function auth that will be used in preValidation array as guard for any private routes.
async function auth(request: FastifyRequest, reply: FastifyReply) {
    const token = (request.headers.authorization || '').replace(/Bearer\s+/, '') || undefined
    request.user = getUser(token)
    if (!request.user) reply.unauthorized()
}
This auth middleware will assign usser to request if token is valid. In other way It will replay with 401.
Formally 401 Unauthorized is the status code to return when the client provides no credentials or invalid credentials. 403 Forbidden is the status code to return when a client has valid credentials but not enough privileges to perform an action on a resource.
But for the sake of simplicity we will skip this nuance. Now we can register /me with pre validation guard.
app.get('/me', {preValidation: [auth]}, User.root)and in src/route/user.ts add controller with name root.
    static async root(req: FastifyRequest, res: FastifyReply) {
        return req.user;
    }
Now lets try to use it. First register account with address from my browser

Then sign nonce in browser

Login using signature to get jwt token

And finally get user data using private route /me

We can cover it by test in jest in file test/account.test.ts
import { getFastifyServer } from '../src/fastify'
import {seed} from "../src/storage/seed";
import {prisma} from "../src/storage/prisma";
import {tokenizeUser} from "../src/auth/getUser";

const address = 'abc';

describe('i can see my account', () => {
    it('using token', async () => {
        await seed();
        prisma.users.create({
            data: {
                address,
                nonce: 'secret'
            }
        })

        const server = await getFastifyServer()
        const result = await server.inject({
            method: 'GET',
            path: '/me',
            headers: {
                authorization: `Bearer ${tokenizeUser({address})}`
            }
        })

        expect(JSON.parse(result.body)).toMatchObject({
            address
        })
        expect(result.statusCode).toEqual(200)
        expect(result.headers['content-type']).toContain('application/json')
    })
})
Unfortunately this leads to deadlock in tests, that are executed simultaneously:
Invalid `prisma.users.deleteMany()` i
nvocation:


    Transaction failed due to a write con
flict or a deadlock. Please retry your tr
ansaction
We can solve it simply adding --runInBand to jest command.
"test": "jest --runInBand",
General improvements in Fastify project
There are three improvements that are can add.
- cors
- colorful errors in logs
- testing in github workflow
Cors
We want to make this api open to accept requests from all domains. Lets install @fastify/cors package
npm i @fastify/corsand in src/fastify.ts simply register it like fastifySensible
import cors from '@fastify/cors'

//...

    app.register(cors)
we can add cors tests in file test/cors.test.ts
import {getFastifyServer} from '../src/fastify'

describe('cors', () => {
    it('for get I have access-control-allow-origin', async () => {
        const server = await getFastifyServer()
        const result = await server.inject({
            method: 'GET',
            path: '/',
        })

        expect(result.statusCode).toEqual(200)
        expect(result.headers['access-control-allow-origin']).toEqual('*')
    })

    it('for options I see cors headers', async () => {
        const server = await getFastifyServer()
        const result = await server.inject({
            method: 'OPTIONS',
            path: '/',
            headers: {
                'Access-Control-Request-Method': 'GET',
                'Origin': 'https://ilove.ethereum'
            }
        })

        expect(result.statusCode).toEqual(204)
        expect(result.headers['access-control-allow-origin']).toEqual('*')

    })
})
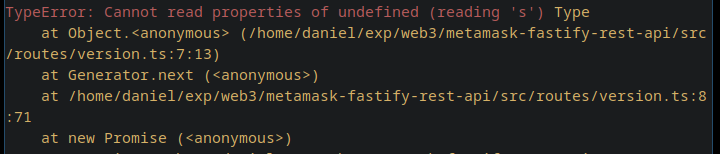
Colorful error logs
To find problems in our code easier we can use colors to print errors:

Lets install cli-color library:
npm i cli-color
npm i -D @types/cli-color
now in src/fastify.ts we can define function shouldPrintError
function shouldPrintError(error: FastifyError) {
    return process.env.NODE_ENV !== 'test' && (!error.statusCode || !(error.statusCode >= 400 && error.statusCode < 500))
}
it decide that we want to print only errors without status code (not handled) or with code other than 4xx. Additionally we not want to see errors in test mode. You can set these conditions as you want, but it is important than we want to treat different types of errors in different manner.
Now we can add hook in body od getFastifyServer
import {red, yellow} from 'cli-color'


    app.addHook('onError', async (request, reply, error) => {
        if (shouldPrintError(error)) {
            console.log(red(error), yellow(String(error.stack).replace(`Error: ${error.message}`, '')))
        }
        if (isNativeError(error)) {
            return reply.internalServerError(error.message)
        }
        throw error
    })
now our errors will be easy to find and analyze in console.
Github workflows
Lets start from checking if our project can be build. In package.json we can add script
"build": "tsc"to remove js files created by this command you can type
tsc --build --cleanIn github you can create basic workflow for node js using gui.
name: Node.js CI

on:
  push:
    branches: [ "main" ]
  pull_request:
    branches: [ "main" ]

jobs:
  build:

    runs-on: ubuntu-latest

    strategy:
      matrix:
        node-version: [18.x]
        # See supported Node.js release schedule at https://nodejs.org/en/about/releases/

    steps:
    - uses: actions/checkout@v3
    - name: Use Node.js ${{ matrix.node-version }}
      uses: actions/setup-node@v3
      with:
        node-version: ${{ matrix.node-version }}
        cache: 'npm'
    - run: npm ci
    - run: npm run build --if-present
    - run: npm test
But it will not work because there is not mongodb in replica set mode.
Fortunatlley configuration on github actions is super easy and after small fixes our workflow looks as follw:
name: Node.js CI

on:
  push:
    branches: [ "main" ]
  pull_request:
    branches: [ "main" ]

env:
  JWT_SECRET_KEY: 123
  DATABASE_URL: mongodb://localhost:27017/web3_bdl

jobs:
  build:

    runs-on: ubuntu-latest

    strategy:
      matrix:
        node-version: [18.x]
        mongodb-version: ['5.0']

    steps:
    - uses: actions/checkout@v3
    - name: Use Node.js ${{ matrix.node-version }}
      uses: actions/setup-node@v3
      with:
        node-version: ${{ matrix.node-version }}
        cache: 'npm'

    - name: Start MongoDB
      uses: supercharge/mongodb-github-action@1.8.0
      with:
        mongodb-version: ${{ matrix.mongodb-version }}
        mongodb-replica-set: rs-test

    - run: npm ci
    - run: npm test
    - run: npm run build --if-present
All presented code can be found in repository:
 gustawdaniel
I hope that you liked this form of publication when we covered all parts from scratch to working demo. Let me know if do you see how can I make my code better or if something presented here helped in your projects.